
It’s usually a lot simpler to convey info with a well-designed diagram than to speak by a big textual content blurb. Because the outdated saying goes, “an image is price a thousand phrases.”
That’s the place Microsoft Visio is available in. A part of the Microsoft 365 suite, this app helps professionals convey info by professionally designed diagrams.
On this article:
- What’s Microsoft Visio?
- Tips on how to discover Visio in Microsoft 365
- Tips on how to create a flowchart in Visio
- Tips on how to create an organizational chart in Visio
- Tips on how to create a Venn diagram in Visio
- Tips on how to create a diagram from scratch in Visio
- Tips on how to save, open, and collaborate on Visio diagrams
What’s Microsoft Visio?
Microsoft Visio is the diagramming and vector graphics utility within the Microsoft Workplace household. If it is advisable to make diagrams reminiscent of determination bushes, circulation charts, org charts, and so forth, that is the Microsoft software to do it. Visio is much less common than different Microsoft apps like Phrase or Excel, however it’s nonetheless a worthwhile software to grasp and use in on a regular basis enterprise.
Though there’s a desktop Visio utility, this cheat sheet will stroll you thru the fundamentals of utilizing Visio in Microsoft 365 — the web-only model that’s included with Microsoft 365/Workplace 365 enterprise and enterprise subscriptions — since most enterprise professionals who use Workplace have entry to this model. All the options within the internet model of Visio will also be discovered within the desktop utility, however not vice versa.
Tips on how to discover Visio in Microsoft 365
For most individuals, Visio is not going to seem by default in your Microsoft 365 dwelling web page. To search out Visio, navigate to your Microsoft 365 dwelling web page, register if you happen to haven’t already, and kind visio within the search bar.
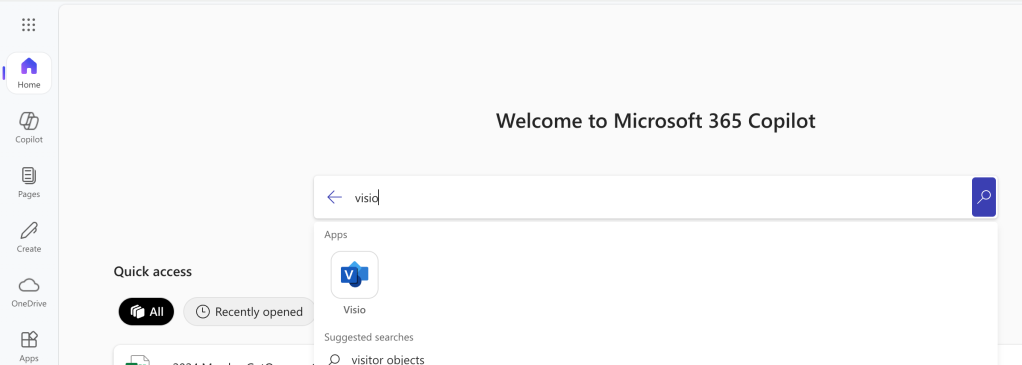
From the Microsoft 365 dwelling web page, seek for Visio and launch it in your browser.
Shimon Brathwaite / Foundry
Click on Visio within the outcomes listing to launch the online app in your browser. You’ll be taken to a web page the place you may see some generally used templates for creating diagrams. This consists of flowcharts, primary diagrams, organizational charts, infographic timelines and extra.
There’s additionally an icon labelled “All templates” — right here you may undergo the whole listing of templates out there in Visio that can assist you discover the precise template that’s proper to your scenario.
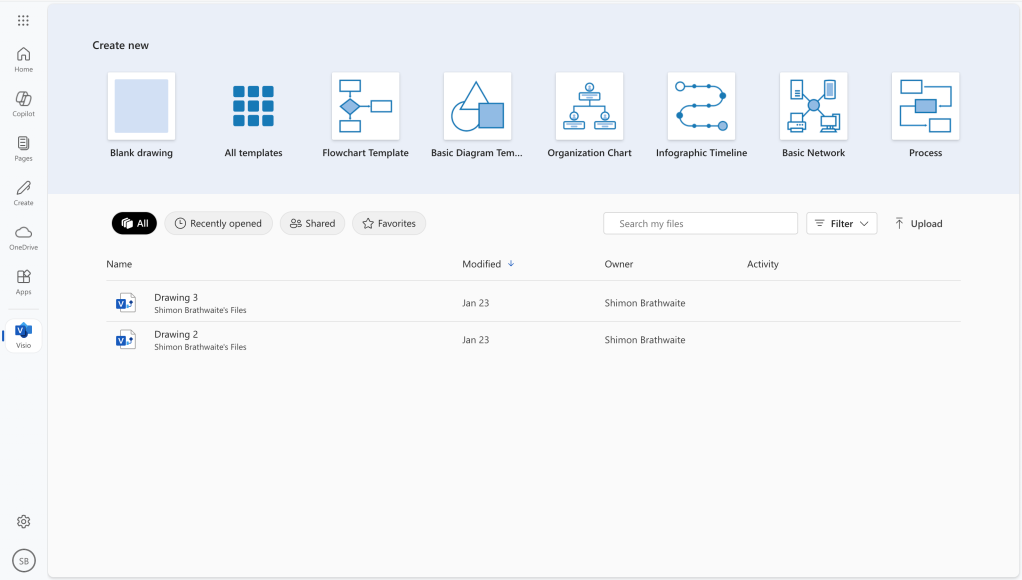
The Visio begin web page affords a wide range of templates to start out from.
Shimon Brathwaite / Foundry
Utilizing templates is the simplest option to start making diagrams in Visio. I’ll stroll you thru three of the commonest Microsoft Visio use instances — creating flowcharts, org charts, and Venn diagrams.
If Visio doesn’t have a template that fits your online business wants, it’s fast and simple to make customized diagrams utilizing Visio’s drag-and-drop options; I’ll present you that course of as effectively.
Tips on how to create a flowchart in Microsoft Visio
A flowchart is a sort of diagram that represents a workflow or course of. It’s glorious for exhibiting the step-by-step course of for finishing a activity whereas supplying you with the pliability to point out completely different choices that should be made and representing if-then eventualities. Microsoft Visio makes it extraordinarily simple to create the sort of diagram.
On this instance, we are going to create a easy circulation diagram to point out what’s going to occur throughout a workforce assembly to debate a brand new concept for a corporation app. The workforce will focus on the thought, resolve in the event that they prefer it, after which take motion primarily based on that call earlier than ending the assembly.
Start by clicking the Flowchart Template icon on the Visio begin web page. You’ll be taken to the principle Visio interface, which seems to be so much like Microsoft Phrase and different Microsoft 365 apps.

The flowchart template opens with primary flowchart shapes within the left column and a clean canvas on the suitable, topped by the Workplace Ribbon toolbar.
Shimon Brathwaite / Foundry
Step one for any flowchart is making a begin level. Click on and maintain the oval Begin/Finish icon within the left panel and drag it onto the clean canvas space on the suitable. The oval object seems with eight “deal with” factors on the corners and sides. To resize the oval, click on and drag any of those handles; to maneuver the oval on the canvas, click on the center of the oval and drag it.
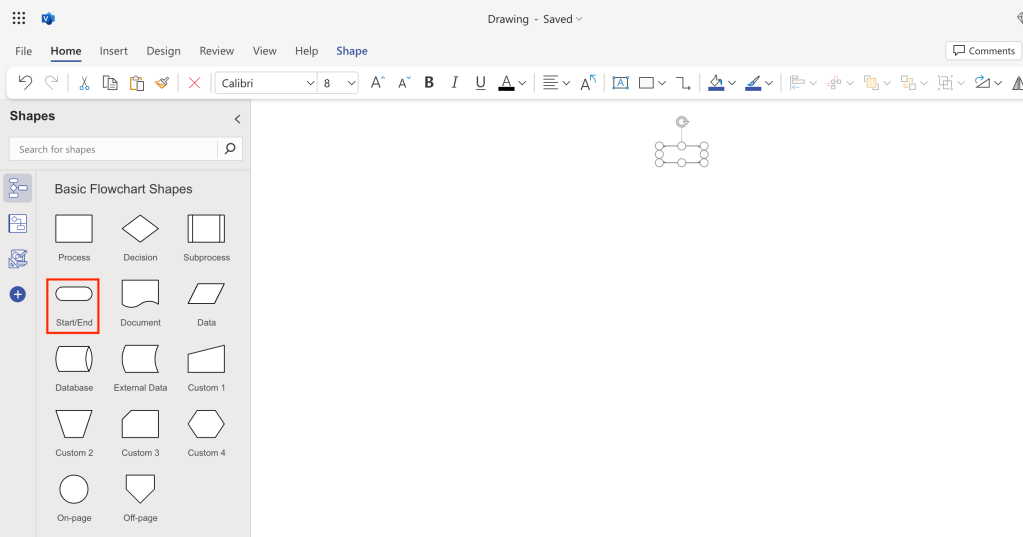
Drag and drop a Begin/Finish oval onto the canvas. You possibly can drag any of the “handles” across the outdoors of the oval to resize it.
Shimon Brathwaite / Foundry
So as to add textual content to a form on the canvas, double-click within the heart of it, and also you’ll enter textual content edit mode — simply sort within the textual content you need to seem there. In our instance, we’ll name the beginning oval form “Workforce Assembly Begins.” You possibly can modify the textual content’s font and measurement utilizing the instruments within the Ribbon toolbar on the prime of the display screen. I like to recommend making the textual content at the least a measurement 24 in order that it’s correctly seen.
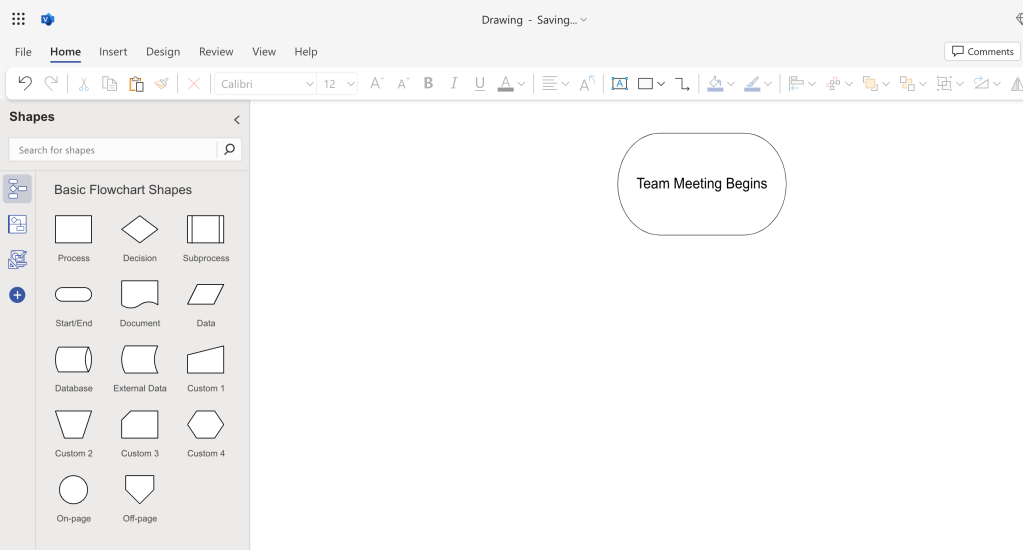
The beginning oval now reveals “Workforce Assembly Begins.”
Shimon Brathwaite / Foundry
Subsequent, it is advisable to add your processes — each step that can be taken for the duty to be accomplished that doesn’t require a call to be made. These are represented by rectangles.
Click on the Course of icon and drag it to the canvas under the oval we added beforehand. As you accomplish that, a dotted inexperienced line seems that guides you to position the rectangle immediately under the oval. Resize the rectangle as wanted, then identify it “Workforce Discusses Thought.”
To attach the gadgets, hover over the underside fringe of the beginning form, then click on and drag from the inexperienced and white button on the beginning form to the highest of the method form. This can create a downward-flowing arrow connecting the 2.
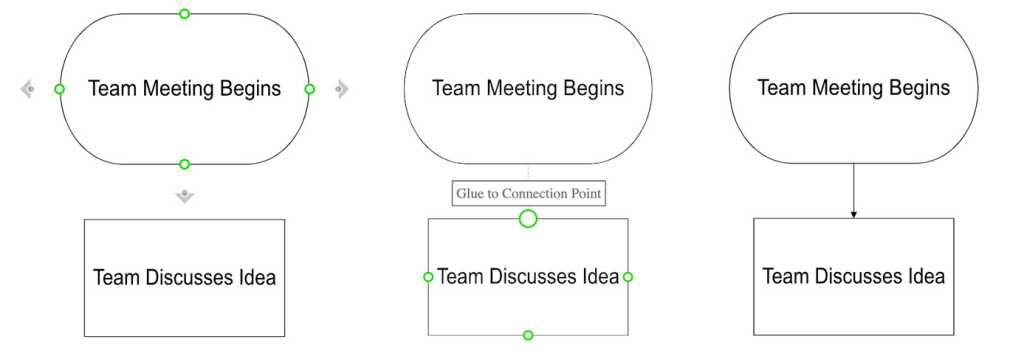
Connecting the method rectangle to the beginning oval.
Shimon Brathwaite / Foundry
If you happen to make a mistake, you may delete any form or line on the canvas by proper clicking-it and deciding on Delete from the pop-up menu.
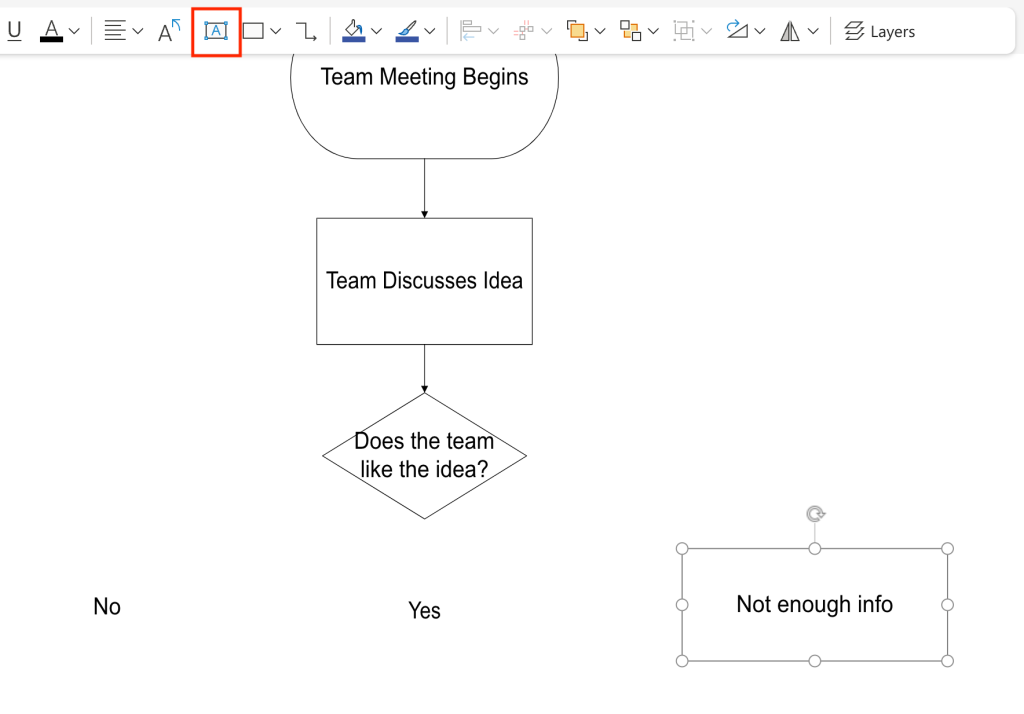
In our flowchart, we’ll subsequent present that the workforce must resolve whether or not they just like the app concept. That is represented by way of a diamond form and may have three potential outcomes.
Click on the Resolution icon within the left panel, drag it under “Workforce Discusses Thought,” and repeat the steps outlined above to resize it, identify it “Does the workforce like the thought?” and join it as proven under.
Add the choice diamond and join it to the method rectangle above.
Shimon Brathwaite / Foundry
The three potential responses to the choice can be “No,” “Sure,” and “Not sufficient data.”
So as to add textual content packing containers for the responses, go to the Residence tab on the Ribbon toolbar and choose the Textual content Field icon (a rectangle with an A within the center). Click on on that, and your cursor will be capable to draw textual content packing containers on the canvas.
The traces round a textual content field seem when you choose the field or sort in it however disappear when not chosen — so the textual content inside seems immediately on the canvas quite than inside a form.
Create a textual content field for every response, then sort the suitable phrase or phrase in each. You possibly can work with textual content packing containers in the identical methods you may with shapes.
Including textual content packing containers for the three potential responses.
Shimon Brathwaite / Foundry
Beneath every textual content field, add an oblong Course of form for its end result and identify the result shapes as proven under. Draw connector traces from the Resolution form to every response and from every response to its end result.
To create connector traces that go throughout after which down the canvas, merely drag from the beginning object out to the aspect after which down, and the connector line will seem the place you dragged.
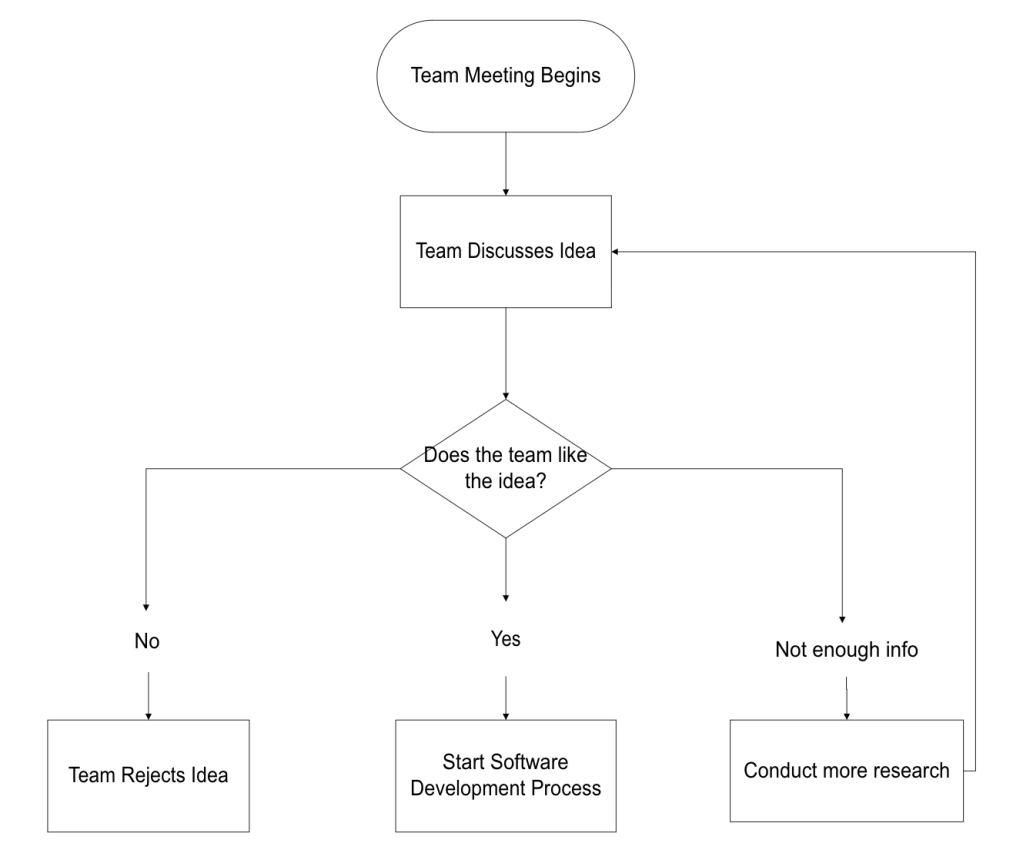
Including and connecting the three outcomes to the flowchart.
Shimon Brathwaite / Foundry
Now we’ve added three potential outcomes to our determination tree that may cowl the potential outcomes of the assembly. Please pay attention to the third determination (furthest to the suitable). Typically chances are you’ll must account for choices that may lead to you going again to an earlier step within the course of and redoing some steps.
(Having the third choice return to a earlier step on this instance is for demonstration functions; in actuality, you’d conduct extra analysis outdoors the assembly after which focus on the thought once more in a later assembly.)
Now there is just one step left: add the ending to the flowchart (utilizing the Begin/Finish form once more), which is when the assembly ends.
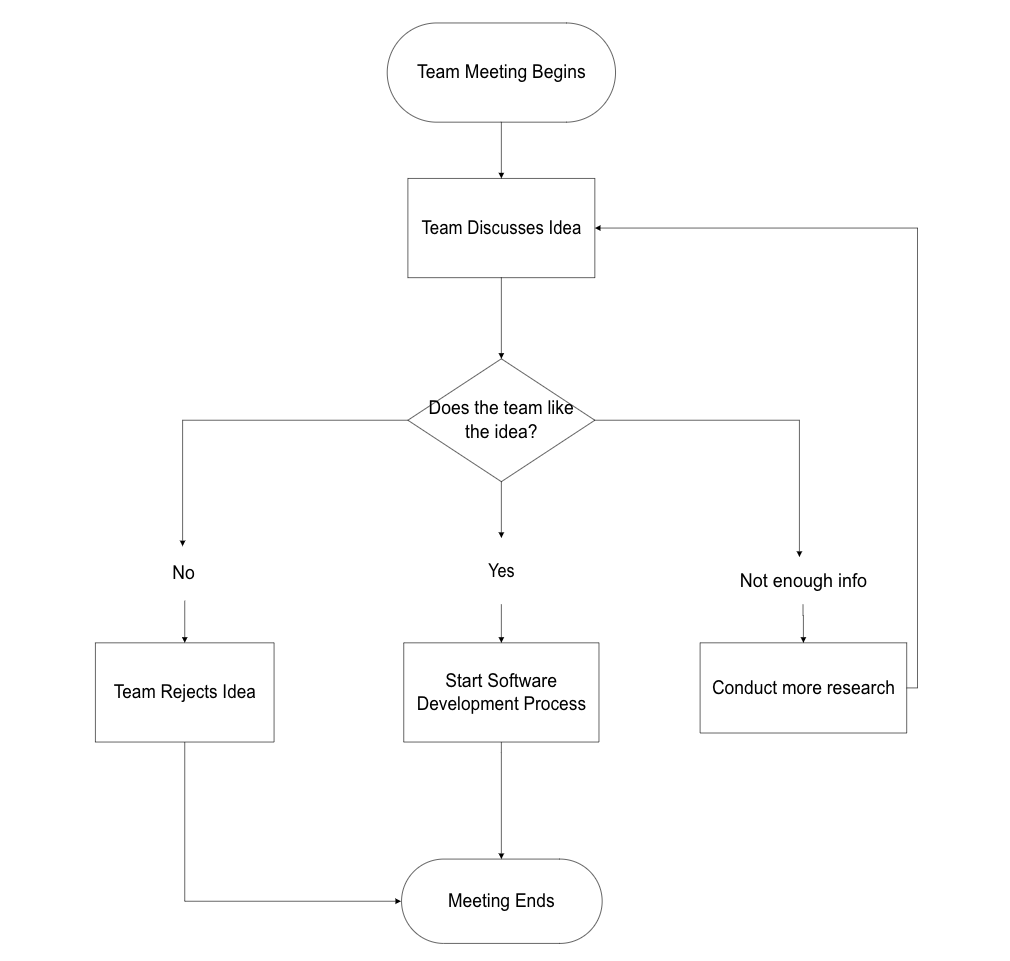
Add, label, and join the top form, and the flowchart is full.
Shimon Brathwaite / Foundry
Tips on how to create an organizational chart in Microsoft Visio
Subsequent, we are going to have a look at the right way to create a easy org chart that consists of 1 head government, their assistant, two managers, and their corresponding groups. Return to the Visio begin web page and click on on the Group Chart template.
Creating an org chart is comparatively easy. As we did with the flowchart, drag and drop the gadgets you need — on this case, coloured rectangles similar to work roles — from the left pane onto the principle canvas and arrange them in a hierarchical construction as proven under.
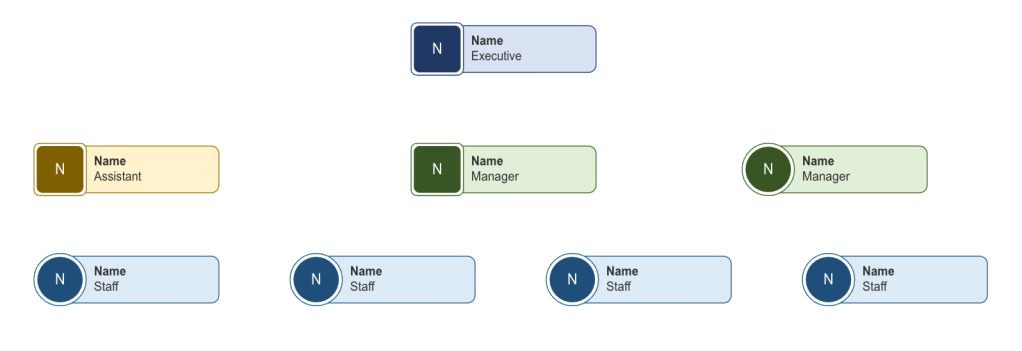
Drag and drop placeholders for the workers in your org chart.
Shimon Brathwaite / Foundry
All that’s wanted after that’s to attract the traces exhibiting the relationships between employees members. As with the flowchart, draw traces going from the higher-level employees to the lower-level employees.

Draw connector traces exhibiting the connection of staff to 1 one other.
Shimon Brathwaite / Foundry
So as to add textual content to the packing containers, click on on every picture, then modify the identify and title of the employees member.

Fill within the staff’ names to finish the org chart.
Shimon Brathwaite / Foundry
Tips on how to create a Venn diagram in Microsoft Visio
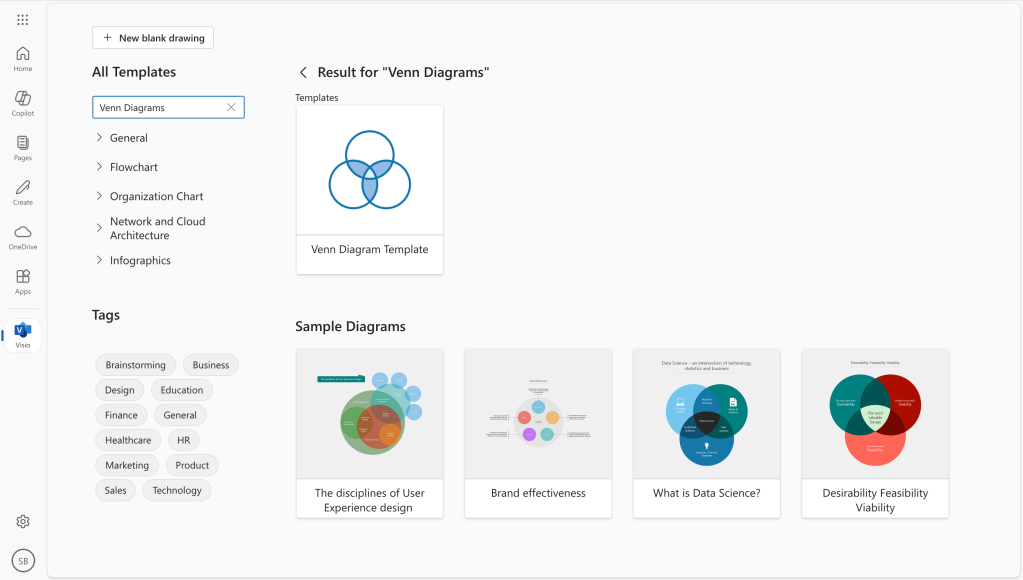
Venn diagrams are a good way to visually examine two or extra teams or gadgets and present the place they overlap. To rapidly create one in Visio, go to the Visio dwelling web page and choose All templates. Within the search bar, sort venn and select Venn Diagrams from the type-ahead choices that seem.
Within the outcomes, you’ll see a primary Venn diagram template in addition to some accomplished pattern diagrams. Choose Venn Diagram Template.
Seek for and choose the fundamental Venn diagram template.
Shimon Brathwaite / Foundry
On Venn diagram constructing web page, you will note a number of form and look choices on the left. For our instance, a easy two-item comparability, choose the 2-sets Venn merchandise and drag it onto the canvas. As with the shapes in different templates we’ve labored with, you may resize the 2-sets Venn merchandise by dragging the “handles” that seem on the corners and edges once you click on on it.
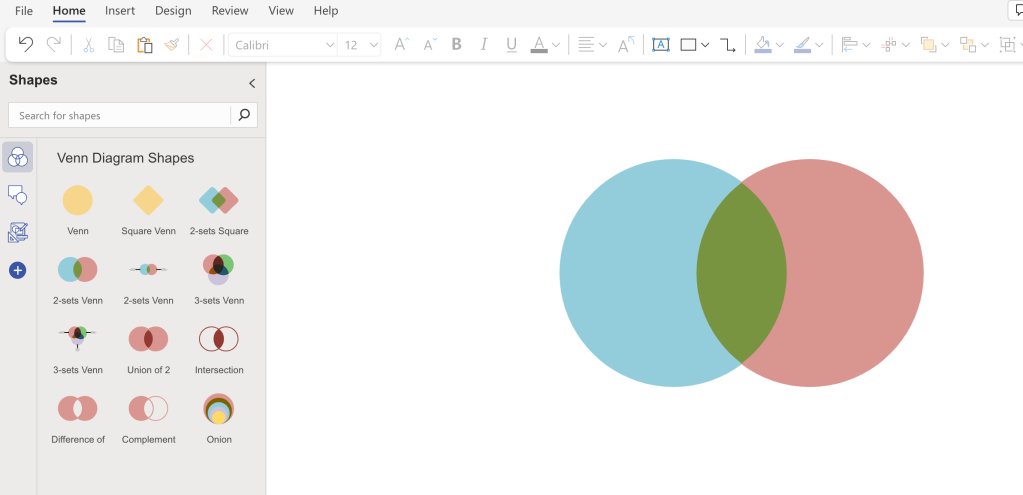
Drag the 2-sets Venn merchandise onto the canvas.
Shimon Brathwaite / Foundry
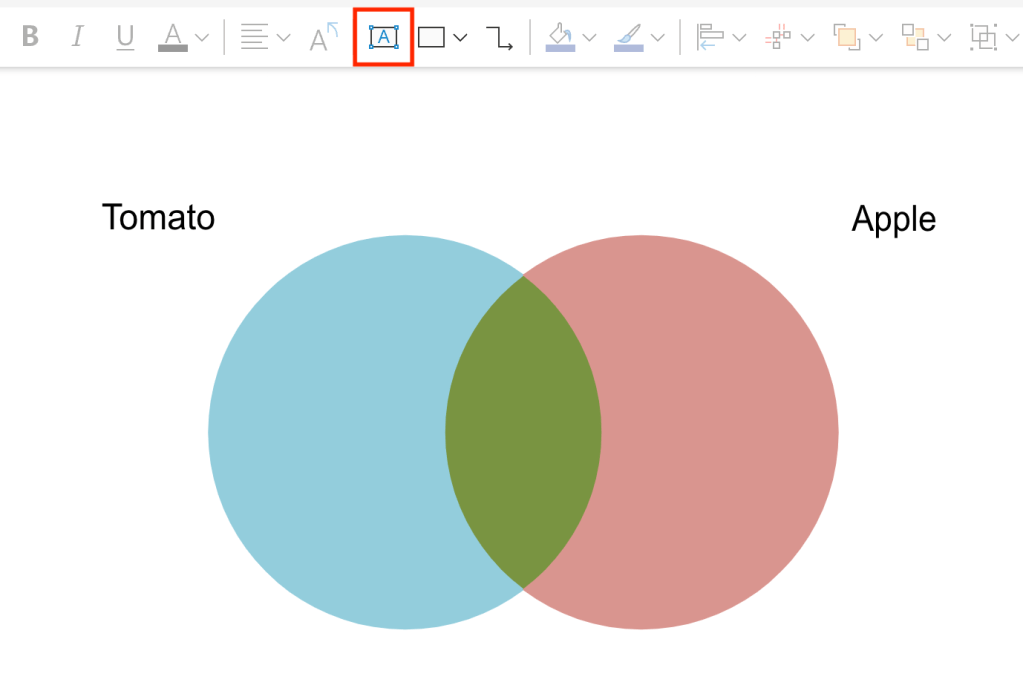
For this instance, we’ll examine tomatoes to apples. Utilizing the Ribbon toolbar, add a textual content field for “Tomato” on the higher left and one for “Apple” on the higher proper.
Add labels for either side of the Venn diagram.
Shimon Brathwaite / Foundry
Now so as to add labels to every portion of the Venn diagram, merely double click on every space (left aspect, center, and proper aspect) and kind within the acceptable textual content. To complete the Venn diagram, add the textual content proven within the image under.
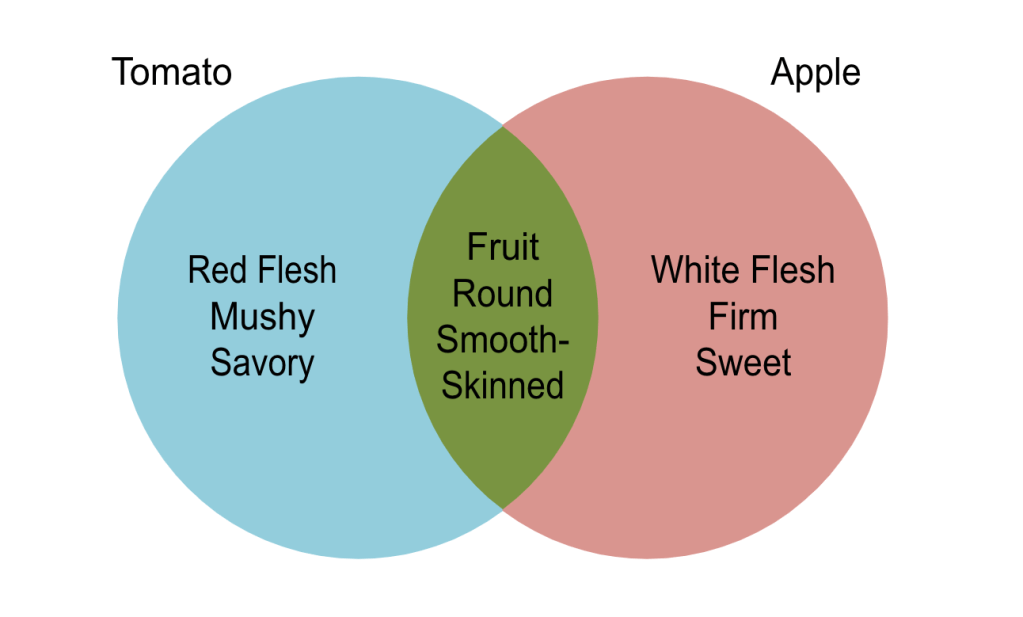
The finished Venn diagram reveals each how tomatoes and apples are completely different and the way they’re alike.
Shimon Brathwaite / Foundry
Tips on how to create a diagram from scratch in Microsoft Visio
If there are not any templates that fit your actual wants, you may create a diagram from scratch. Whereas we will’t anticipate each motion you may need to absorb making a customized diagram, listed below are the fundamental steps.
To start, from the Visio begin web page, click on Clean drawing.
1. Choose and place your shapes.
As when utilizing a template, you’ll see the Shapes panel on the left aspect of the display screen, with a clean canvas to the suitable. The fundamental constructing blocks of your diagram are completely different shapes that you just use to symbolize completely different gadgets. Click on and drag your required form(s) onto the canvas.

Drag any shapes you need to use for a diagram from the shapes panel onto the canvas.
Shimon Brathwaite / Foundry
You possibly can transfer, resize, and add textual content to shapes on the canvas simply as we did when utilizing a template.
Along with the generic shapes that seem within the Shapes pane by default, you may search for customized icons that extra precisely describe the knowledge that you just need to convey. Click on the plus image on the left of the panel, and also you’ll be capable to flick thru a number of collections of shapes and icons that you would be able to pin to your panel, reminiscent of Cycle Diagram Shapes, Enterprise Frameworks, and Interface Icons. (In reality, Visio templates are principally focused units of those form collections.)
You can even use the search field on the prime of the Shapes panel to seek for particular icons, as proven under.
Use the search field to seek out extremely particular shapes or icons to your diagram.
Shimon Brathwaite / Foundry
2. Add arrows
Subsequent, it is advisable to use arrows as connectors to point out relationships between the gadgets in your diagram. These arrow photos assist folks to grasp the logical route that info is flowing. Click on the icon with two curved arrows on the left of the Shapes panel to see the Arrow Shapes assortment.
Visio affords an array of arrow varieties you should use to point out the development of your diagram.
Shimon Brathwaite / Foundry
3. Apply a theme
Themes might be useful to make your diagrams extra visually interesting or to mirror firm or consumer colour schemes. To pick a theme, go to the Design tab within the Ribbon toolbar, click on Themes, and choose the theme of your selection.
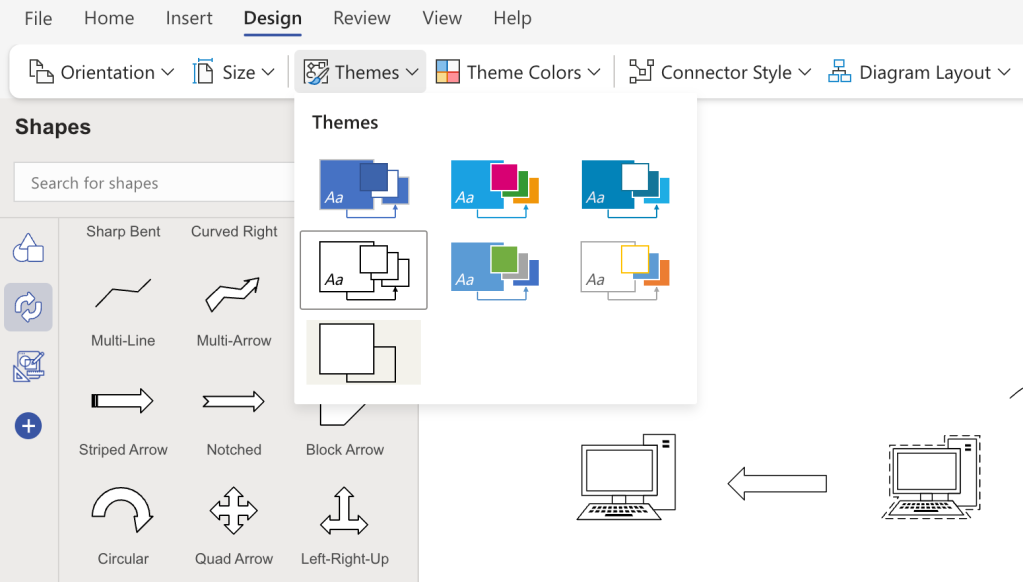
Making use of a theme makes your diagram extra engaging and simpler to absorb rapidly.
Shimon Brathwaite / Foundry
Tips on how to save, open, and collaborate on Visio diagrams
As you’re engaged on a diagram in your browser, Visio autosaves your work, calling it “Drawing” (or “Drawing2,” “Drawing3,” and so on.) by default. To alter its file identify to one thing extra significant, click on its identify within the title bar on the prime of the display screen and kind in a brand new identify.
You possibly can simply rename your diagrams.
Shimon Brathwaite / Foundry
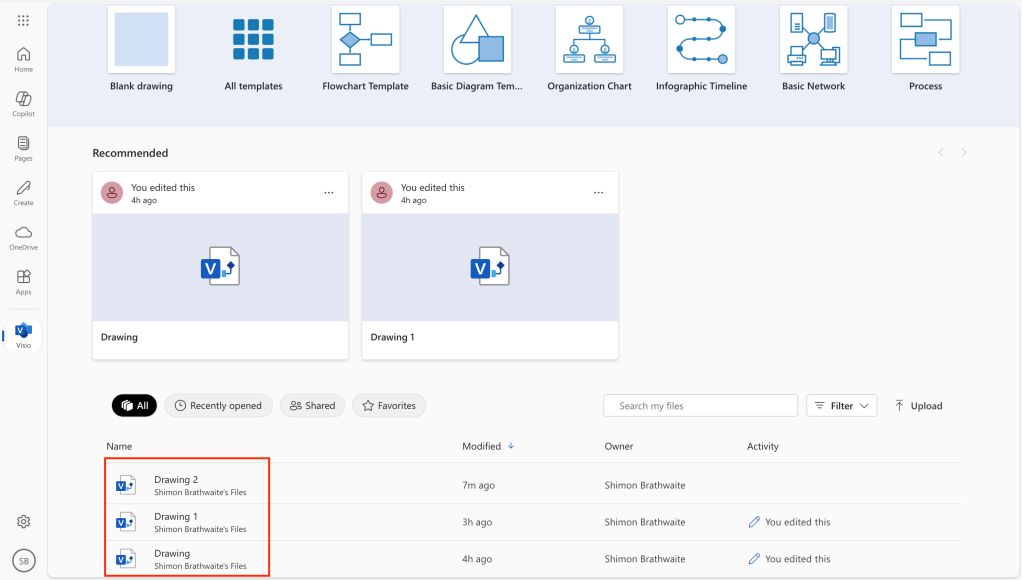
Whenever you return to the Visio begin web page, you’ll see all of the diagrams you’ve created (and that others have shared with you) in a listing on the backside of the web page. Click on any file identify within the listing to open the diagram.
Visio information you will have entry to are listed on the Visio dwelling web page.
Shimon Brathwaite / Foundry
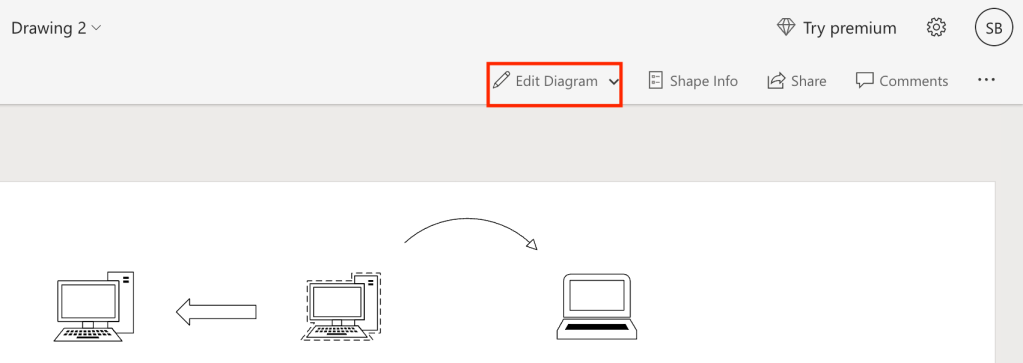
The diagram will open in a mode that permits you to view and touch upon it however not edit it. To change to enhancing mode, choose Edit Diagram > Edit in Browser on the prime proper of the display screen.
Whenever you open a saved diagram, you’ll must click on Edit Diagram to make adjustments to it.
Shimon Brathwaite / Foundry
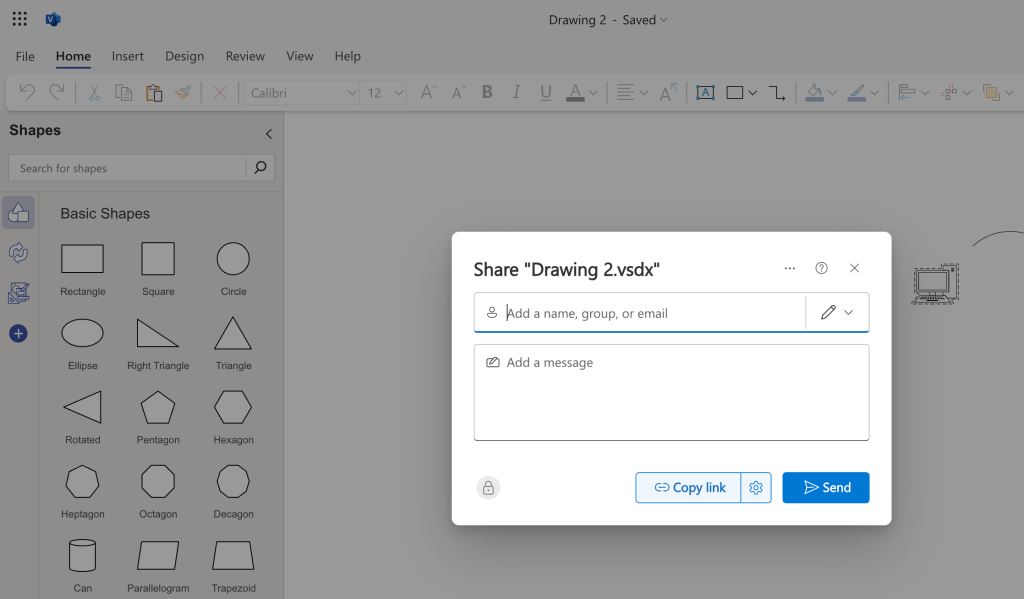
Like Phrase, PowerPoint, and different Microsoft 365 apps, Visio enables you to collaborate on diagrams with co-workers in actual time. Microsoft calls this “co-authoring.” To share a diagram, click on the Share button at prime proper and choose Share from the menu that seems.
The “Share” pane seems. Right here you may sort in colleagues’ names or e mail addresses and an non-compulsory message. Click on the pencil icon on the proper to decide on whether or not you need to let the folks you’re inviting edit the diagram or just view and touch upon it. Whenever you’re executed, click on Ship, and your invitees will obtain an e mail with a hyperlink the place they will entry the diagram.
You possibly can invite colleagues to collaborate on a Visio diagram.
Shimon Brathwaite / Foundry
So as to add a remark to a diagram, click on the Feedback button on the prime proper after which click on New within the pane that seems. Or, to touch upon a selected merchandise within the diagram, click on its form after which click on the New button within the Feedback pane.
Kind your remark within the remark field (you may @point out somebody to name their consideration to it) after which click on the Put up remark button (a paper airplane icon). Others can learn and reply to your feedback and/or add their very own feedback.

Including a remark to a diagram.
Shimon Brathwaite / Foundry
Now you’re all set to start creating and sharing customized diagrams for each enterprise want.
This text was initially revealed in January 2023 and up to date in February 2025.